...
https://code.google.com/p/agrovoc-cs-workbench/wiki/VB2_Installation (note: if you want to perform a quick test-drive of VB, you don't need to follow this)
In the above wiki page, several configuration parameters have been defined, belonging to the different components which are part of VB2.0. The user may refer to a particular installation configuration presented there, as a series of ATTRIBUTE-VALUE pairs, where ATTRIBUTE is one of the configuration parameters required by the installation and VALUE represents the specific value which will be assigned for that particular configuration. This installation guide will use ATTRIBUTE names which are consistent with those present in the wiki.
...
Apache Tomcat web server (version 6.0 or higher)
EXAMPLE: debian:apt-get update; apt-get install sun-java6-jdk apache2 tomcat6 libmysql-javaMySQL database server (version 5.0 or higher)
EXAMPLE:debian:apt-get install mysql-server
- Note Root password
- Add extra users for VocBench if required
- OWLIM (Version {OWLIM.VERSION}). (you may postpone the installation of OWLIM if you want to test VocBench with a small thesaurus; we recommed however OWLIM for better reliability and larger scalability)
Our Software
- Semantic Turkey ServerVersion {ST.Version}), or just ; use the packages package found in the INST_PKG: ST-Server.zip
and SemanticTurkeyData.zip(see installation steps)
- VocBench application war file {VB.VERSION} use the package found in the INST_PKG
- VocBench OSGi bundle for ST { ST.VB-BUNDLE.VERSION}, or ; just use the package found in INST_PKG;
Data
...
- (usually, it comes already ambedded inside the Semantic Turkey package)
Data
- Administrator Database {VB.DB.VERSION}
...
Setting up the main Software Components
1.
...
Semantic Turkey Server Setup
...
...
2. Semantic Turkey Server Setup
- Unzip the package ST-Server.zip in a directory of your choice
- In the same directory where the new ST-Server directory has been unzipped, unzip SemanticTurkeyData.zip (so that the extracted SemanticTurkeyData and the ST-Server folders are siblings under the same directory)Optional: you may change the content of the file install.cfg to have the SemanticTurkeyData directory into another position of your choice
In the directory ST-Server, there are batch files for Windows (.bat) and UNIX (.sh) to launch the server.
A further integration step would ask for VocBench OSGi bundle {ST.VB-BUNDLE.VERSION} to be copied inside the ST-Server directory under folder ST-Server\extensions\service. However, the OSGi bundle already comes packed inside the ST-Server, so perform this only if you get a specific update of the OSGi bundle.
3. Import the Administrator Database SQL Dump File ({VB.DB.VERSION}) on MySQL Server
EXAMPLE: debian: mysql -u {your.db.user} -p < administrator20.sql
4. VOCBENCH Setup
...
...
- Unzip the package ST-Server.zip in a directory of your choice
- Just make sure that you have no other copy of st-server in the same folder, or they will clash with each other.
In the directory ST-Server, there are batch files for Windows (.bat) and UNIX (.sh) to run the server.
A further integration step would ask for VocBench OSGi bundle {ST.VB-BUNDLE.VERSION} to be copied inside the ST-Server directory under folder ST-Server\extensions\service. However, the OSGi bundle already comes packed inside the ST-Server, so perform this only if you get a specific update of the OSGi bundle.
2. Import the Administrator Database SQL Dump File ({VB.DB.VERSION}) on MySQL Server
EXAMPLE: debian: mysql -u {your.db.user} -p < administrator20.sql
3. VOCBENCH Setup
- Drop the {VB.VERSION} .war file in the Tomcat webapps folder and start Tomcat
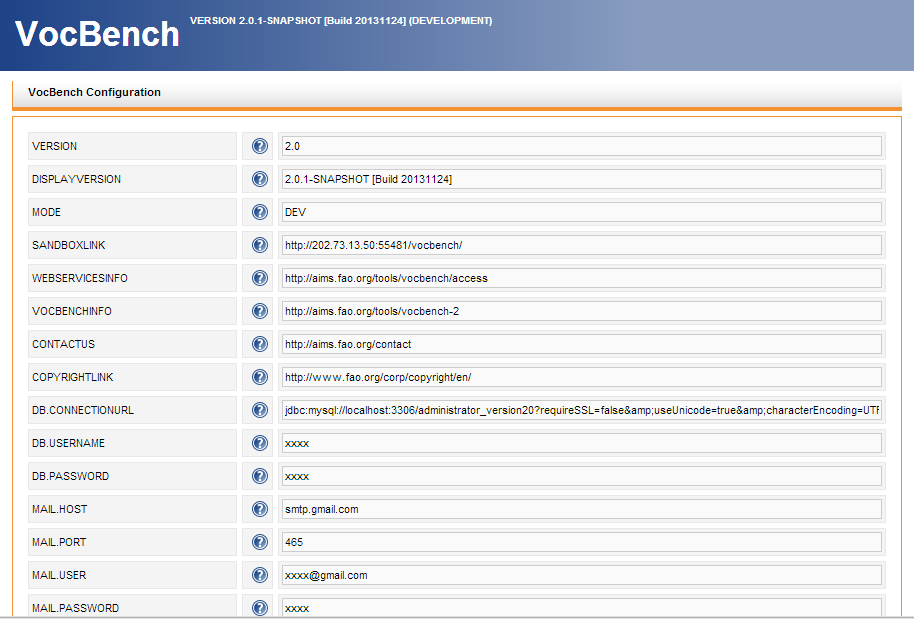
- VB allows updating your configuration file at the time of first load after installation. All properties the values of which are filled with xxxx should be mandatorily filled by the user, while the others may be kept as they are (though can be customized as well). Note that any specificity in the installation of the other tools may require changes in these properties (e.g. the DB.CONNECTIONURL may need to be changed to reflect a different port for your MySQL installation).
- See also the System Administration Guide for more information on these properties.
4. OWLIM Setup (you may postpone the installation of OWLIM if you want to test VocBench with a small thesaurus; we recommed however OWLIM for better reliability and larger scalability)
- By using the content of {OWLIM.VERSION}, follow the instructions online at: http://owlim.ontotext.com/display/OWLIMv52/OWLIM-SE+Installation#OWLIM-SEInstallation-Easyinstall
only for deploying the OWLIM .war files into Tomcat. We will ot use OWLIM for a first inst
Configuring a specific instance in OWLIM (you may postpone the installation of OWLIM if you want to test VocBench with a small thesaurus; we recommed however OWLIM for better reliability and larger scalability)
1. OWLIM REPOSITORY SETUP and DATA LOADING
...
- After triple store selection, it will prompt for available triple storage mode as follows
- In memory/persistent
- In memory/no persist
- Native store/persistent
- Remote access
Creating a plain Sesame2 project (no OWLIM)
- Now instead of remote access, select “in memory/persistent”
- You can leave the other parameter values (1000, true, true) as they are
- Continue with the instructions as in “Running the system”
Creating an OWLIM project
- Select remote access option and it will prompt to input following parameters:
- repositoryId
- ID of the sesame2 repository to be accessed (e.g. {OWLIM.REPOSITORY_ID})
- This should match the ID value used in repository (Repository ID value while creating new repository in OWLIM)
- serverURL
- URL to the server of the rdf repository (e.g. http://localhost:8080/openrdf-sesame)
- Username
- Identifier for the user connecting to the rdf repository
- If not applicable, add “test” as this is mandatory field
- Password
- Password for the user connecting to the rdf repository
- If not applicable, add “test” as this is mandatory field
- Click on [?] icon to view each field information.
- It is assumed that Repository Server is already running and new repository has been created.
- Click [Add] button to create the project.
- Newly created project will be added to the list.
- repositoryId
...