Introduction
This document provides detailed installation instructions for configuring and deploying VocBench version 2.2. Instructions for older versions may be accessed here
The installation package of Vocbench downloadable from its project site, which contains all or most of the components for installing VB2.0, will be referred along the guide as:
INST_PKG
When a file name for an installation component is referred in this guide without further specifying its full path, we are assuming it is in INST_PKG.
If you have already installed vocbench in the past, you may want to read the next section, otherwise you may skip it and go directly to the "Requirements" section.
Main changes in the installation procedure wrt last (2.1) version
The main change consists in the automatic DB installation procedure. Now VB uses a framework for maintaining the DB and for automatically updating it together with each new release of the platform. Each time VB is started, it checks whether the DB schema is up to date with its known most recent version. In affirmative case, VB starts, otherwise, it informs the user that the DB needs to be updated. The updates are organized in chunks of scripts, each representing a new change in the DB structure (mostly scheme changes, but also data which may affect the behaviour of the system).
Thus, from version 2.1 on, there is no need anymore of manually installing the DB. If you have a previous version of the DB which is thus precedent to this new automatic DB management, VB should recognize and update it as well. The available scripts should cover all past versions of the DB which have been distributed with VB since its first 2.0 release. However, if you own an older DB for whatever reason, or if you experience any issue, you may contact us on the mailing list and ask for help.
Requirements
Third Party Software
Apache Tomcat web server (version 6.0 or higher)
EXAMPLE: debian:apt-get update; apt-get install sun-java6-jdk apache2 tomcat6 libmysql-javaMySQL database server (version 5.0 or higher)
EXAMPLE:debian:apt-get install mysql-server
- Note Root password
- Add extra users for VocBench if required
- OWLIM. (you may postpone the installation of OWLIM if you want to test VocBench with a small thesaurus; we recommed however OWLIM for better reliability and larger scalability; see "Running VocBench on OWLIM SE")
Our Software
- Semantic Turkey ServerVersion; use the package found in the INST_PKG: ST-Server.zip (see installation steps)
- VocBench application war file use the package found in the INST_PKG
- VocBench OSGi bundle for ST; just use the package found in INST_PKG; (usually, it comes already ambedded inside the Semantic Turkey package, you may check it in the
/extensions/servicefolder of the Semantic Turkey server)
Installation Steps
Setting up the main Software Components
1. Semantic Turkey Server Setup
- Unzip the package ST-Server.zip in a directory of your choice
- Just make sure that you have no other copy of st-server in the same folder, or they will clash with each other (this happens for historical reasons, due to an old requirement for ST to look for extensions in folders which are siblings of its installation folder. This feature will be removed from the next version)
In the directory ST-Server, there are batch files for Windows (.bat) and UNIX (.sh) to run the server.
A further integration step would ask for VocBench OSGi bundle {ST.VB-BUNDLE.VERSION} to be copied inside the ST-Server directory under folder ST-Server\extensions\service. However, the OSGi bundle already comes packed inside the ST-Server, so perform this only if you get a specific update of the OSGi bundle.
2. VOCBENCH Setup
- Drop the {VB.VERSION} .war file in the Tomcat webapps folder and start Tomcat
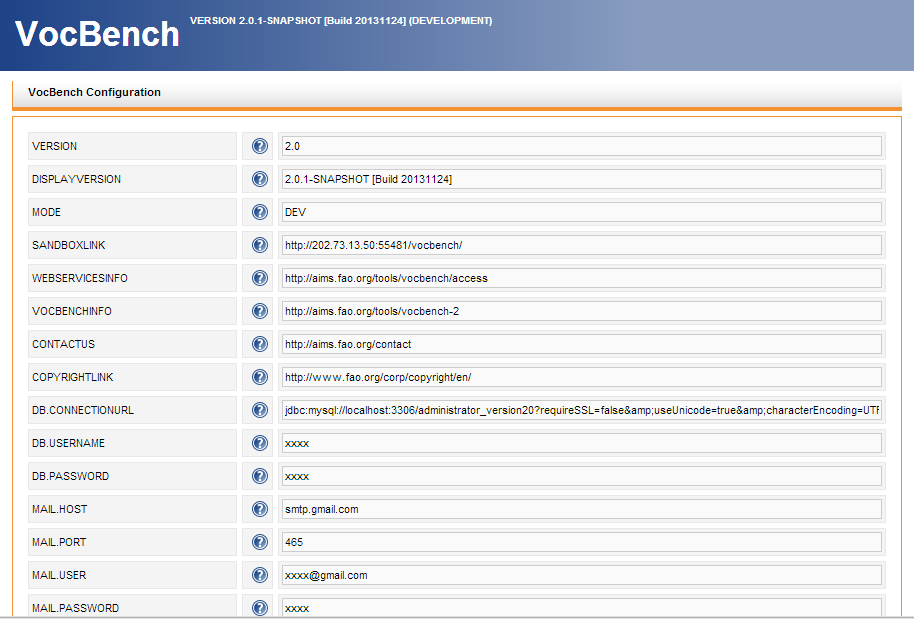
- Reach vocbench at the address: http://localhost:8080/vocbench/ (the port depends on your Tomcat settings). A configuration menu will be shown. All properties the values of which are filled with xxxx should be mandatorily set by the user, while the others may be kept as they are (though can be customized as well). Note that any specificity in the installation of the other tools may require changes in these properties (e.g. the DB.CONNECTIONURL may need to be changed to reflect a different port for your MySQL installation).
- for a plain simple installation, with standard MySQL settings, the minimal requirement is to set the password of the root account of the DB. All the other configuration parameters can be left unchanged, thus assuming the default values. These parameters can be changed later by explicitly invoking the configuration menu from inside VB.
- for a plain simple installation, with standard MySQL settings, the minimal requirement is to set the password of the root account of the DB. All the other configuration parameters can be left unchanged, thus assuming the default values. These parameters can be changed later by explicitly invoking the configuration menu from inside VB.
- See also the System Administration Guide for more information on these properties.
Running the System
Running Semantic Turkey
Start Semantic Turkey by using the batch file in the ST-Server directory (server_run.bat for windows and server_run.sh for UNIX systems).
Running Vocbench
VB has been preconfigured with administrator user. Use following credentials to connect as administrator.
Username: administrator
Password: 111111
Administrators are the super users who can create/approve requests for new users.
Playing around
Now, let's go for a first Quick Test Drive !!!
There is a list of Frequently Asked Questions (FAQs) addressing specific issues related to installation